 I was happy to make the desserts for my friend Sara's bridal shower last week. It took me a while to decide on what I was going to make, I knew there had to be cheesecake. I found a great recipe in the Demarle "Families Cooking Across America" cookbook.. If you have never been to bakerella.com you must check it out sometime, that is where I got my idea for cake balls. And to top it off I made some quick, easy and delicious mini cupcakes.
  This is our flower cooling rack, let me tell you this came in very handy especially since I was baking 3 desserts at once it gave me a place to cool some of the molds and trays and free up some of my perforated baking sheets baking sheets. Everything was made using various Demarle products, I'll break it down for you starting with my most tedious dessert - the cake balls...
Red Velvet Cake Balls
-1 box of Cake Mix (Really, any cake mix will do. Sara's colors happen to be black, red and while so what better cake than Red Velvet!)
-3 large eggs
-vegetable oil
-1 tub frosting (I used cream cheese frosting)
PART 2 INGREDIENTS
-Baking chocolates or Chocolate Chips
TOOLS
-mixing bowl-set of 3 spatulas
-heat resistant spatula
-any demarle mold (I used the Twist Mold) - if you don't own a demarle mold bake cake in regular baking pan

So, start by combining the cake mix, eggs and oil. Stir until well combined, my mixer came in very handy. Don't you love the bright red color? Next, Pour it into your demarle mold, I used my twist mold. Really any mold will do (large round, bundt you name it!)
Follow the directions on your baking mix for temperature and time. When all is said and done, let the cake cook and effortlessly remove from the mold. You can see below how easily the cake is removed! Demarle bakeware require no greasing or spray prior to baking, ever.


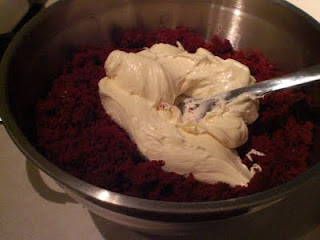
After you have ooed and awed at how beautiful your cake design is crumble it up into a bowl, see below. Add the frosting and mix until combined.

Next step is to roll the cake/frosting mixture into balls, any size you would like. The ones I made were maybe the size of a golfball.
Place them onto your silpat on a baking sheet or a baking sheet covered in parchment paper. Place it in the freezer for at least an hour to harden. This makes your next step a lot easier!
The next step is to melt your chocolate so you can dip and cover the cake, then roll in your choice of almonds, sprinkles, peanuts or whatever your heart desires! Cool on the same silpat/baking sheet you used before. These can be stored in the refrigerator or freezer. Below if my finished product:
 |
| Red Velvet Cake Balls |
The mini-cupcakes were also made from another boxed cake mix. I used my mini-muffin tray and perforated baking sheet. I used a piping bag for the frosting design.

 |
| Vanilla Mini Cupcakes with Vanilla Frosting in white and bright baby blue color |
Cheesecake this recipe came from the Demarle "Families Cooking Across America" cookbook. Let me know if you need the recipe! Demarle products used: Flower cooling rack, magnetic measuring cups, spatula, mixing bowl, large round mold and perforated baking sheet.


The measuring cups came in very handy not only for measuring out ingredients but also for crushing the Grahams for my crust.


 |
| The cheesecake really does not even stick to the Demarle non-stick mold. |
 |
| So easy to remove, just like your old springform pan! |
 | ||
| Final product for the Strawberry Cheesecake!! |

